Rolling Storage Rack
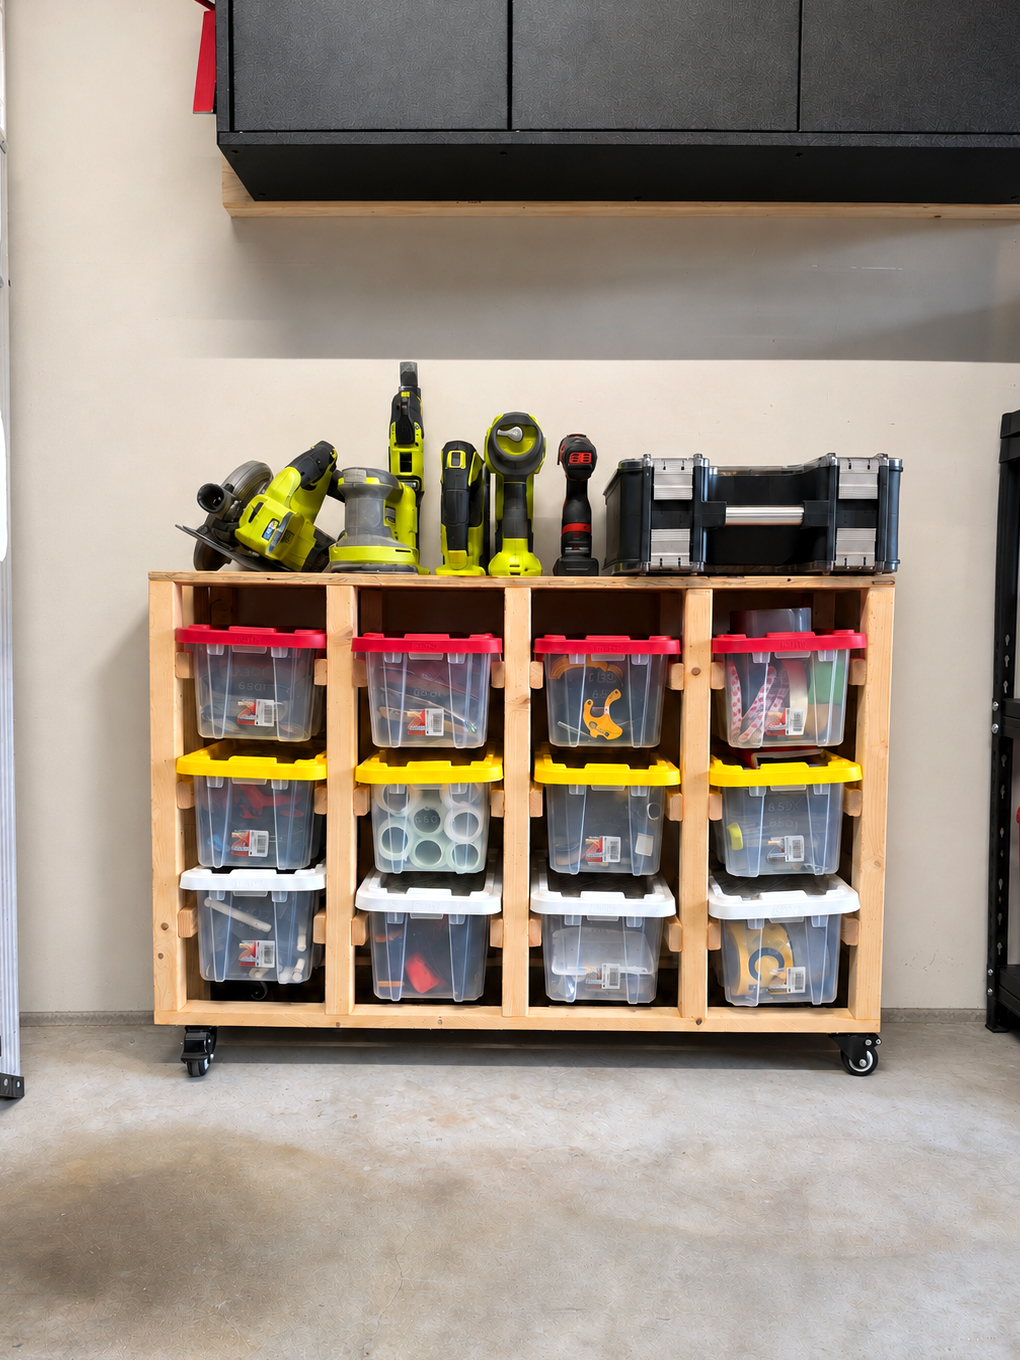
Build a compact storage rack that holds twelve 6.5-quart HDX clear storage totes in four columns and three rows. Each bin slides out individually without unstacking anything, and the plywood top provides extra storage space for tools and shop supplies. This beginner-friendly project can be built in one morning using inexpensive lumber and scrap plywood.
Materials
- 3 × 2″×2″×8′ furring strips (legs)
- 4 × 1″×2″×8′ furring strips (bin support rails)
- 1 × 1″×3″×8′ furring strip (bottom stretchers)
- 1 × 12″×41″ piece of scrap plywood (top)
- 12 × 6.5-quart HDX clear storage totes
- Wood glue
- Brad nails
- Wood screws for attaching the plywood top and stretchers
- 4 × 2″ casters with mounting hardware (optional)
Tools
- Miter saw or circular saw
- Brad nailer
- Drill/driver
- Tape measure
- Speed square
- Clamps
- Pencil
Steps
- Cut the lumber according to the cut list. You’ll need ten legs, twenty-four support rails, and two bottom stretchers. Budget four 8-foot 1×2 boards for the twenty-four full 12″ rails so you have enough material to account for saw kerf.
- Build five upright support frames using two 23 5/8″ legs per frame. Position the legs approximately 12″ apart and attach the horizontal rails with wood glue and brad nails. Keep everything square during assembly.
- Configure the rails based on the frame location. The two outside frames each need three rails on their inside face. The three interior frames need three rails on both faces. This creates four separate bin columns using twenty-four rails total.
- Space the three rail levels approximately 5 1/2″ apart (estimate here) vertically to accommodate the totes. Use an actual bin to confirm the spacing, since the tote lips need to rest on the rails without the bins rubbing against the level above.
- Dry fit all five upright frames before permanently attaching them together. Place the twelve totes between the frames in four columns and three rows. Adjust the frame spacing until both lips of every tote rest securely on the support rails. Each bin should slide in and out freely without binding or falling between the supports.
- Once you’re happy with the spacing, position the 12″×41″ plywood top across all five frames. Make any final adjustments, then secure it with wood screws. I used ten screws total, one at each leg location. Predrill where necessary to prevent splitting.
- Attach the two 41″ bottom stretchers along the lower front and back of the rack. Secure them to the upright frames to help keep the structure aligned and rigid.
- Optionally install four 2″ casters near the corners of the bottom structure. Use suitable mounting hardware and make sure the casters are securely supported. This makes it easier to roll the rack around the garage or reposition it beneath wall cabinets.
- Slide all twelve totes into place and test each one individually. The finished rack keeps small parts organized, makes every bin accessible, and provides a useful plywood work surface for lightweight tools and supplies.
Cut List
- 10 × 23 5/8″ legs from 2×2 lumber
- 24 × 12″ bin support rails from 1×2 lumber
- 2 × 41″ bottom stretchers from 1×3 lumber
- 1 × 12″×41″ plywood top (slightly wider in case you need to shave it down)
Notes
- Dry fitting is the most important part of this project. Don’t permanently lock in the frame spacing until you’ve tested the actual totes. The bin lips should sit on both rails with just enough clearance for smooth sliding.
- I prefer clear HDX totes because I can see what’s inside without opening every container. The 6.5-quart bins were selling for approximately $2 each (sometimes under $3) when I built this rack, making them an affordable option for organizing small parts.
- This rack solves the biggest problem with stacking totes: having to remove several bins just to reach the one on the bottom. With individual rails, every container slides out independently.
- Each outside frame has three rails on one face, while each interior frame has six rails split between both faces. That gives you twenty-four support rails total. Each rail is a full 12″ long.
- Although the original materials list called for three 8-foot 1×2 boards, four boards are needed to cut twenty-four full 12″ rails when accounting for saw kerf.
- My finished rack measures approximately 40″ wide, 12″ deep, and 28″ tall. I specified a 41″ plywood top and 41″ bottom stretchers in the plans to give builders an extra inch of flexibility when spacing their totes. For a flush 40″ finished width, verify your layout and trim the top and stretchers to fit. Using the full 41″ pieces may create an overhang or a wider overall unit.
- The approximate 28″ finished height is based on my build. Adding casters or changing the rail spacing can affect the final height.
- The design is easy to customize. Adding a fourth row increases capacity to sixteen totes in a four-column layout. This requires taller legs and an additional eight support rails.
- Adding a fifth column increases capacity to fifteen totes in a five-column, three-row layout. This requires one additional interior-style upright frame, six additional rails, and longer top and bottom stretchers.
- You can adjust the layout to match the number of totes you own. I recommend planning around complete columns or rows so the finished rack stays balanced and makes efficient use of materials.
- If installing casters, choose ones rated for the combined weight of the rack, bins, and stored contents. Reinforce the mounting locations if needed, especially when using thin furring strips.
- The plywood top is handy for storing small tools, chargers, and miscellaneous garage supplies. Avoid placing excessive weight on top without adding extra bracing.
Difficulty: Easy
Estimated Time: 3-4 hours